Linking Containers using Docker-Compose
Over the last couple of months, I’ve been on a quite a journey with Docker and Microservices. I have the goal of moving some of our monolith applications to a Microservice based architecture using Docker. Up until recently, most of the containers I have been working with have been single isolated containers. As I start to think about how we’re going to break apart the monolith, I can’t help but think about how we’re going to pin all the parts of our system together. I’ve been reading about Service Discovery a bit and I understand it conceptually for the moment, which is enough. This journey I am on is not a race, as I want to fully understand how, what and why we would want to build our applications this way.
PLEASE NOTE: I am using Docker 1.9 in this tutorial
For this tutorial, I have put together a sample application to demonstrate linking containers and how they can be accessed. In this example, I have an ASP.Net Core 1.0 MVC6 Website, a Background Service (Console Application that will run as a deamon) and a RabbitMQ instance. This application just sends text that the user inputs in the website to the background service using RabbitMQ as the middleware. The sample was purposely kept simple so that the concept is clearly understood.
Prerequisites for Tutorial
- Local Machine running Docker (version 1.9 at the time of writing this tutorial)
- a Web browser, such as Google Chrome
For simplicity, I have deployed these images to the DockerHub so that we can focus on the Docker Compose file
Before I look at consul and other service discovery tools, I wanted to understand how linking works in Docker using Docker-Compose. I love the idea of compose! the ability to fit all the pieces of the application together like a jigsaw using a single yaml file sounds awesome… but as the compose documentation highlights, this shouldn’t be used in production! So doesn’t seem the right approach when thinking about how we will deploy / orchestrate our applications in Production. It’s a good first step toward understanding how linked containers are pinned together.
Copy and paste the code below into a new file somewhere on your machine. For the purposes of this article I will save this file to C:\Temp\DockerSample\Docker-Compose.yml
ui:
  image: jsm85/dockercomposesampleui
  links:
    - rabbit:rabbit
  ports:
    - "5001:5001"
service:
  image: jsm85/dockercomposesampleservice
  links:
    - rabbit:rabbit
rabbit:
  image: "rabbitmq:3.6-management"
Next, open a new Docker Quickstart Terminal and navigate to the directory where the Docker-Compose.yml file is; in this case C:\Temp\DockerSample
Now run the follow command:
docker-compose up
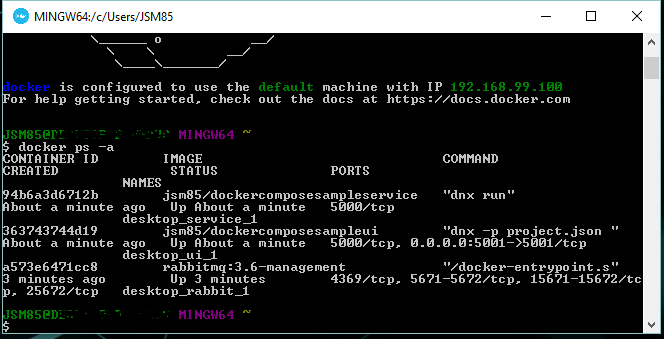
This command will now execute the configuration in the yml file. It will pull down all the required images from the Docker Hub, if you haven’t already got them, then run them in as containers on your Docker machine. It will also link the UI and Service containers to the RabbitMQ container. After the script has finished, you should be able to verify they are all running by executing the following command in your Docker Quickstart Terminal
docker ps -a
You should see all 3 processes up and running like so:
For the next part of the tutorial we’ll need to know the IP address of your Docker machine. Execute the following command:
docker-machine ip default
Let’s now test our application; open a new browser and navigate to the website we just deployed: http://[DOCKER_HOST_IP]:5000 in my case it’s http://192.168.99.100:5000. As mentioned in the intro, this application is a simple one, and it’s only feature is to send a text input as a message that the Background Service will output to the console.
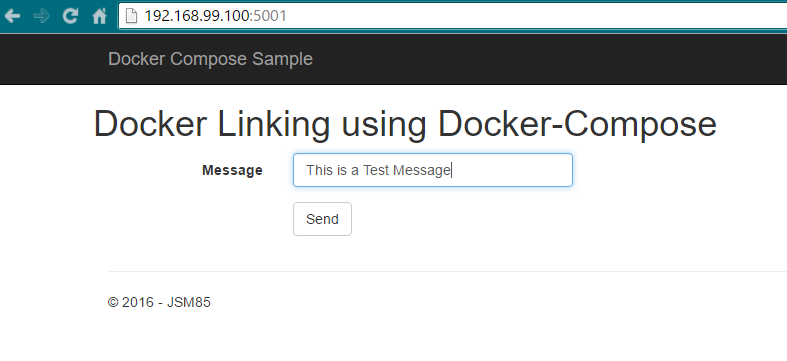
Add some text in the input and press Send. If you now revisit the Docker Quickstart Terminal, you will see that your message was received by the service and outputted to the console.

The main take away that I want to draw your attention to is the connection string for the RabbitMQ broker service. The connection string for connecting to RabbitMQ is the name of the alias in the compose file.
var bus = RabbitHutch.CreateBus("host=rabbit");
Thanks for reading and I hope you found this informative.
